Can shock absorbers make noise?
While there can be various reasons for noise from shock absorbers, the most common cause is incorrect installation. For example, the mounting kit washers may have been installed in the incorrect order, an old mounting kit may have been reused with the new shock absorber, or the top nut of the shock absorber may have been over- or under-tightened.
Can shock absorbers leak?
Yes, there are several reasons why this may occur, such as reusing an old protection kit with a new shock absorber, tightening the shock absorber mounts with the car wheels hanging freely, or incorrect installation of the shock absorber with an asymmetric bush design.
How do I know if my shocks are bad?
Some typical signs of bad shocks to look out for: pronounced car body roll and pitch, excessive vibrations on the steering wheel, imprecise and unresponsive steering, noisy chassis operation, "cupping" revealed during tire inspection, excessive oil leakage, and any signs of physical damage.
In this article we will learn how to diagnose the most common faults with shock absorbers and suspension struts that can lead to customer complaints and warranty claims. We will study why these problems appear and understand their main effects on suspension performance as well as how to avoid them in the future. Let's start.
1. EXCESSIVE TIGHTENING OF THE STRUT’S TOP NUT – LOSS OF DAMPING CAPABILITY, BREAKAGE OF THE ROD
A common customer complaint stems from the incorrect tightening torque of the strut’s top nut. This nut holds together the strut, the top mounting kit and the spring. The top nut should be installed correctly and tightened with a very specific torque, which in most cases ranges from 41 nm to 68 nm – far below the torque generated by a pneumatic torque wrench. When the strut's top nut is overtightened, the whole strut assembly can break free from its location. If this happens on the road, then it can cause a serious accident. That’s why it’s important that, during the fitting process, all bolts and nuts should be tightened using a torque wrench to the manufacturer’s recommended specifications.

During troubleshooting, be sure to inspect the top nut’s surfaces, as impact guns often leave tell-tale signs. Overtightening often causes the stem to break at an acute angle, while the vibrations induced by impact guns can also loosen the nut on the other side of the piston rod. Failures of this type might not be considered as a warranty claim as they are not related to a manufacturing problem.
2. USE OF WRONG TOOLS AND INCORRECT PROCEDURES – DAMAGED ROD THREADS
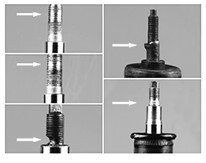
Another common problem caused by incorrect tools and procedures is damage to the stem threads. This happens during fitting if the top nut is placed incorrectly over the rod thread and then tightened with an air gun. This will damage the thread. In addition, if the mounting kit washers are installed in the incorrect order, one may become loose, hitting the lower part of the rod stem. As well as creating noise, this will often lead to damage over part of the thread or the rod itself. As these issues are likely to have arisen due to incorrect installation, they would not be considered warranty claims.
3. USE OF INAPPROPRIATE TOOLS TO HOLD THE STRUT PISTON ROD WHILE TIGHTENING THE TOP NUT
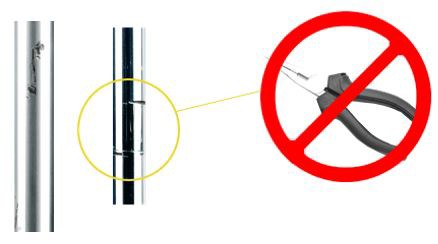
A common type of failure occurs when an installer uses pliers to hold the strut's piston rod while tightening the upper nut. This causes very characteristic damage to the chromium surface of the piston rod with marks appearing on both sides of the rod corresponding to where the pliers were used. Once the shock absorber is compressed, the damaged area of the piston rod passes through the strut's seal, tearing it, and leading to oil and gas leakage. This problem can be easily avoided with the use of suitable tools to hold the rod in place while tightening the top nut to the proper torque. For this reason, this type of failure will likely not be considered a valid warranty claim.
4. SHOCK ABSORBERS AND STRUTS NOT REPLACED IN PAIRS ACROSS AN AXLE – PREMATURE FAILURE OF THE SHOCK ABSORBER
Shock absorbers and struts are considered wear and tear items, and in typical use are subjected to more than 2,200 rebound compression cycles per kilometre. After 80,000 km the shock has endured more than 176 million cycles. This inevitable wear affects the performance of the various internal parts in different ways. The oil loses viscosity making the compression and rebound movements softer and less well controlled. The anti-friction band between the piston and the working chamber wears, allowing a certain amount of oil to pass through the gap, softening the shock and reducing control. If just one shock on that axle is replaced, one will be stiffer than the other, with the new unit quickly becoming overloaded as it tries to control all the rebound and compression efforts of the suspension. The new unit will quickly become damaged, losing oil and gas through the top seal, often as it overheats. For this reason, Monroe always recommends replacing the shocks and struts in pairs on each axle and, in the case of struts, to fit them together with new Protection and Mounting Kits. As a result, any failure caused by single replacement cannot be considered a manufacturing defect.

5. OLD MOUNTING KIT FITTED IN COMBINATION WITH NEW SHOCK ABSORBER – INCORRECT OPERATION OF THE SUSPENSION, STEERING WHEEL LOCKS AFTER CORNERING, EXCESSIVE VIBRATION THROUGH THE STEERING WHEEL
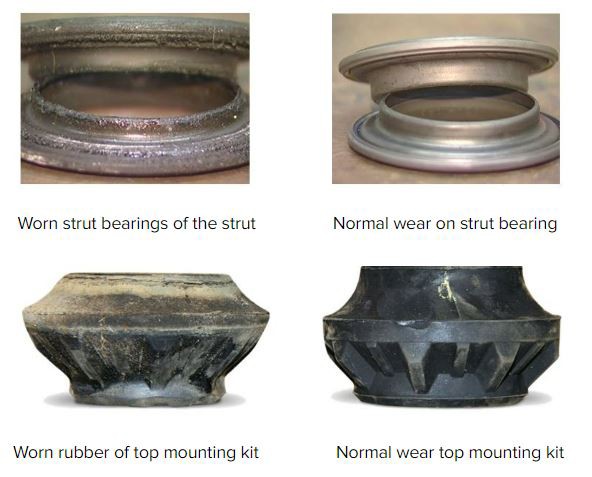
The top mounting kits are subject to severe wear and tear and they are made of two fundamental parts: a rubber element, and a strut bearing that facilitates the rotation of the wheels while turning. Over time these elements wear out and must be replaced to ensure proper operation of the suspension and braking system. If the mounting kits are in poor shape, this may cause a serious accident, particularly if the steering wheel becomes locked as it returns to the center position after cornering. As the rubber element becomes harder over time, vibration and noise can soon be experienced. Their lifespan under normal driving conditions is approximately 80,000 km, in line with that of the shock absorbers and struts. Therefore, Monroe recommends that whenever shock absorbers or struts are replaced, new Mounting Kits should be fitted at the same time. In the Monroe range, all Mounting Kits have part numbers starting with the letters ”MK” (Mounting Kit). You can find Mounting Kits listed in the Monroe catalogue near the shock absorber reference.
6. OLD PROTECTION KIT REFITTED WITH NEW SHOCK ABSORBER – PREMATURE FAILURE OF THE SHOCK DUE TO OIL LEAKAGE, EXCESSIVE CAR BODY ROLL, BRAKE DISTANCE INCREASE, SUSPENSION PARTS PREMATURE FAILURE
Monroe Protection Kits are made of two essential parts. The first, the compression bumper, is made of a high-density polyurethane foam with a specific conical shape that becomes harder the more the unit is compressed. Placed on the top of the strut's piston rod, its main task is to limit roll, dive and squat of the car’s body.
There are two main designs of the compression bumper:
- Some vehicles use a compression bumper attached to the lower part of the mounting kit. In this case the internal diameter of the bumper will be much bigger than the diameter of the shock absorber’s rod. Some installers think this an indication of a wrong part, but it is not.
- Some vehicles have this element tightly covering the shock absorber’s rod. As it gets older, high-density polyurethane becomes porous and the internal diameter of the bumper becomes larger, loosening the fit over the rod. Inside the gap, abrasive particles can build up, and this can cause damage to the chromium coating of the rod leading to oil leakage. In addition, modern asphalt is often made from recycled tires which contain phosphorus. During the heat of summer, small asphalt particles transfer to the shock absorber’s rod, creating chromium phosphate crystals, a very hard substance with sharp edges which further damages the rod seal.
Normally the stroke of the shock absorber is around 4-5 cm, but as the compression bumper degrades it can move as much as 12 cm in some cases. This can result is unwanted body movements and can even lead to increased wear elsewhere in the suspension such as springs and ball joints, in turn leading to poor steering control and reduced braking performance.
The second key element of the Monroe Protection Kit is the dust cover. Usually made of high-resistance rubber, it has the important task of protecting the shock absorber rod from contact with abrasive particles such as mud, salt, asphalt, water and dust that could irreversibly damage the chrome surface and cause the shock absorber to fail. It’s worth regularly inspecting the condition of each shock absorber by running a fingernail over the rod surface, as any burrs or scratches will be easy to spot.
Any imperfections in the rod surface can damage the shock absorber's oil seal causing oil and gas to escape from the unit rendering it useless, especially if the shock absorber is pressurized. The lifespan of protection kits can vary widely depending on the climate and how the vehicle is used, but as a rule based on more than 100 years of experience Monroe recommends replacing them after 80,000 km and always when the struts or shocks are replaced. In the Monroe range, all Protection Kit part numbers start with the letters “PK” (Protection Kit) and each contains a set for two shock absorbers. You can find Protection Kit references in the Monroe catalogue next to the shock absorber reference.
7. INCORRECT POSITION OF THE COMPRESSION BUMPER DURING PROTECTION KIT INSTALLATION – BLOCKED SHOCK ABSORBER – TOO STIFF SUSPENSION
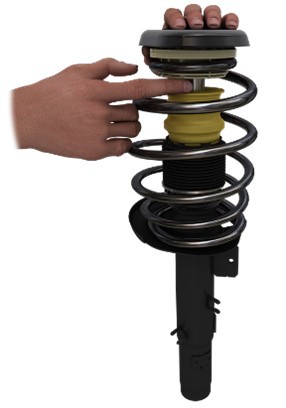
The position of the protection kit compression bumper is very important. A common mistake during installation is to pull the compression bumper down to the bottom of the strut in order to gain access to the rod when attempting to tighten the top nut. However, this causes the bumper to prevent proper movement of the suspension and creates an extremely hard ride. Correct installation involves simply moving the compression bumper (the yellow part in the picture below) to the top of the rod, leaving around one finger’s gap to the bottom surface of the mounting kit.
8. ONE SIDE OF THE SHOCK ABSORBER’S HOUSING HAS DAMAGE TO THE PAINT – OIL LEAKAGE DUE TO SILENT BLOCK TYPE SHOCK ABSORBERS MOUNTED ON THE VEHICLE WITH THE WHEEL ASSEMBLIES LEFT TO HANG FREELY. SHOCK ABSORBERS WITH AN ASYMMETRIC BUSH DESIGN CAN LEAVE SIMILAR SIGNS IF INSTALLED INCORRECTLY.
If a shock absorber appears to have lost paint on one side of the housing, this is most likely due to misalignment of the shock absorber during installation. It often happens when the shock absorber mountings are tightened while the car is raised on a 2-point lift with the wheels hanging freely with fully extended shocks. The rubber element of the silent block acts like a spring and is designed to elastically deform during rotation of 45 degrees in each direction. If the mountings are tightened with the suspension fully extended, when the car is lowered to the ground the rubber silent blocks become fully turned by more than 45 degrees. Once the driver climbs abord, the extra load further exacerbates the problem, and the shock absorber becomes completely blocked. It may even experience excessive side force, forcing it into a parabolic shape, and this will typically cause the rear of the car to be raised in relation to the front. If spotted quickly, it can be corrected by undoing the shock mountings with the car on the ground and retightening to the recommended torque settings. In the pictures below we can see the consequences of this problem: the dirt shield edge starts to touch the housing at one side and scratches the paint. The side force applied to the rod deforms the oil seal causing it to leak. Overheating often leaves traces further behind, such as a discoloration on one side of the rod.
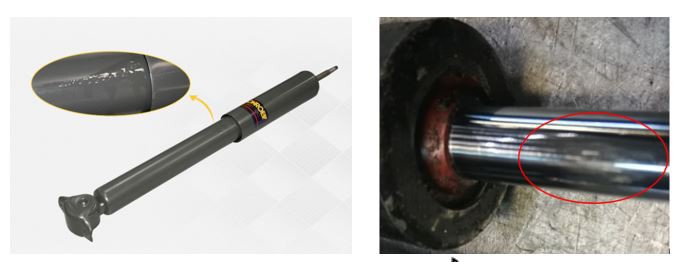
The ideal way to finally tighten shock absorber’s mounts is to do it under load with the car on the ground and with one person inside. If accessing the mountings in this position is difficult, it is possible to set the distance between two eyelets of the shock in accordance with the installation instructions. With the part on the table, use a marker to draw a line on the housing aligned with the edge of the dirt shield. Install the shock in the car and tighten the mounting by hand. Finally, use a hydraulic jack to lift the axle to align the edge of the dirt shield with the mark made previously and tighten the mountings to the recommended torque.
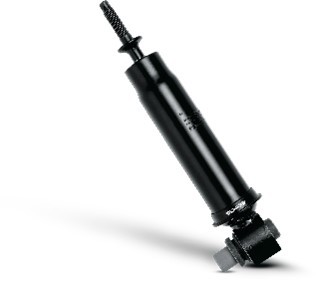
some shocks have an asymmetric bushing design and must be mounted in a certain position in relation to their lower fixing.
These units are designed to use this asymmetric bushing (see picture below) to keep the shock absorber operating in its correct position. If the shock absorber is installed with an incorrect orientation of the asymmetric bushing, then the same problem as that described above can occur. In this case, the shock absorber experiences a side force that causes jamming and oil leakage. This problem may also occur if the wheels are not properly aligned after the shock absorbers have been replaced. Both problems arise due to incorrect installation and therefore might not considered a valid warranty claim.
Are shocks covered under warranty?
Whether a guarantee is granted on the shock absorbers depends on the respective manufacturer, i.e. the corresponding brand. A voluntary warranty is not always granted, in which case only the statutory right to the products applies (in the event of a manufacturing defect). Monroe recently extended its warranty to 5 years for the full light vehicle range for specific series and certain regions*: Shock Absorbers, Struts, Mounting Kits, Protection Kits and Springs. The industry-leading 5-warranty highlights the enhanced driving safety benefits and exceptional durability that come when installers and their customers choose Monroe products.
*Please check the potential applicability of the 5 years warranty in the table included in Warranty conditions (garagegurus.tech)
You can download our installation tips file for further information. Our YouTube channel also includes several videos that can assist you further.
We hope that you have enjoyed learning about this article related to typical shock absorber faults, how to diagnose them and how to avoid invalid warranty claims.
Share it with whoever you think might be interested!
The content contained in this article is for informational purposes only and should not be used in lieu of seeking professional advice from a certified technician or mechanic. We encourage you to consult with a certified technician or mechanic if you have specific questions or concerns relating to any of the topics covered herein. Under no circumstances will we be liable for any loss or damage caused by your reliance on any content.

 English
